Friday, March 29, 2013

Scrapping Everyday Miracles HOP into Spring Blog Hop


SCRAPPING EVERYDAY MIRACLES
HOP into SPRING BLOG HOP!
MARCH 29th - 31st


Hi SEM Blog Hoppers! Christy here...and I'm super excited to be part of this 
 Hop into Spring Blog Hop !


The project I created to share with you this weekend is an Art Journal page.
For me Spring means rebirth, the flowers are popping up again, color is spreading all around. What once was dull and drab is full of promise and new beginnings.
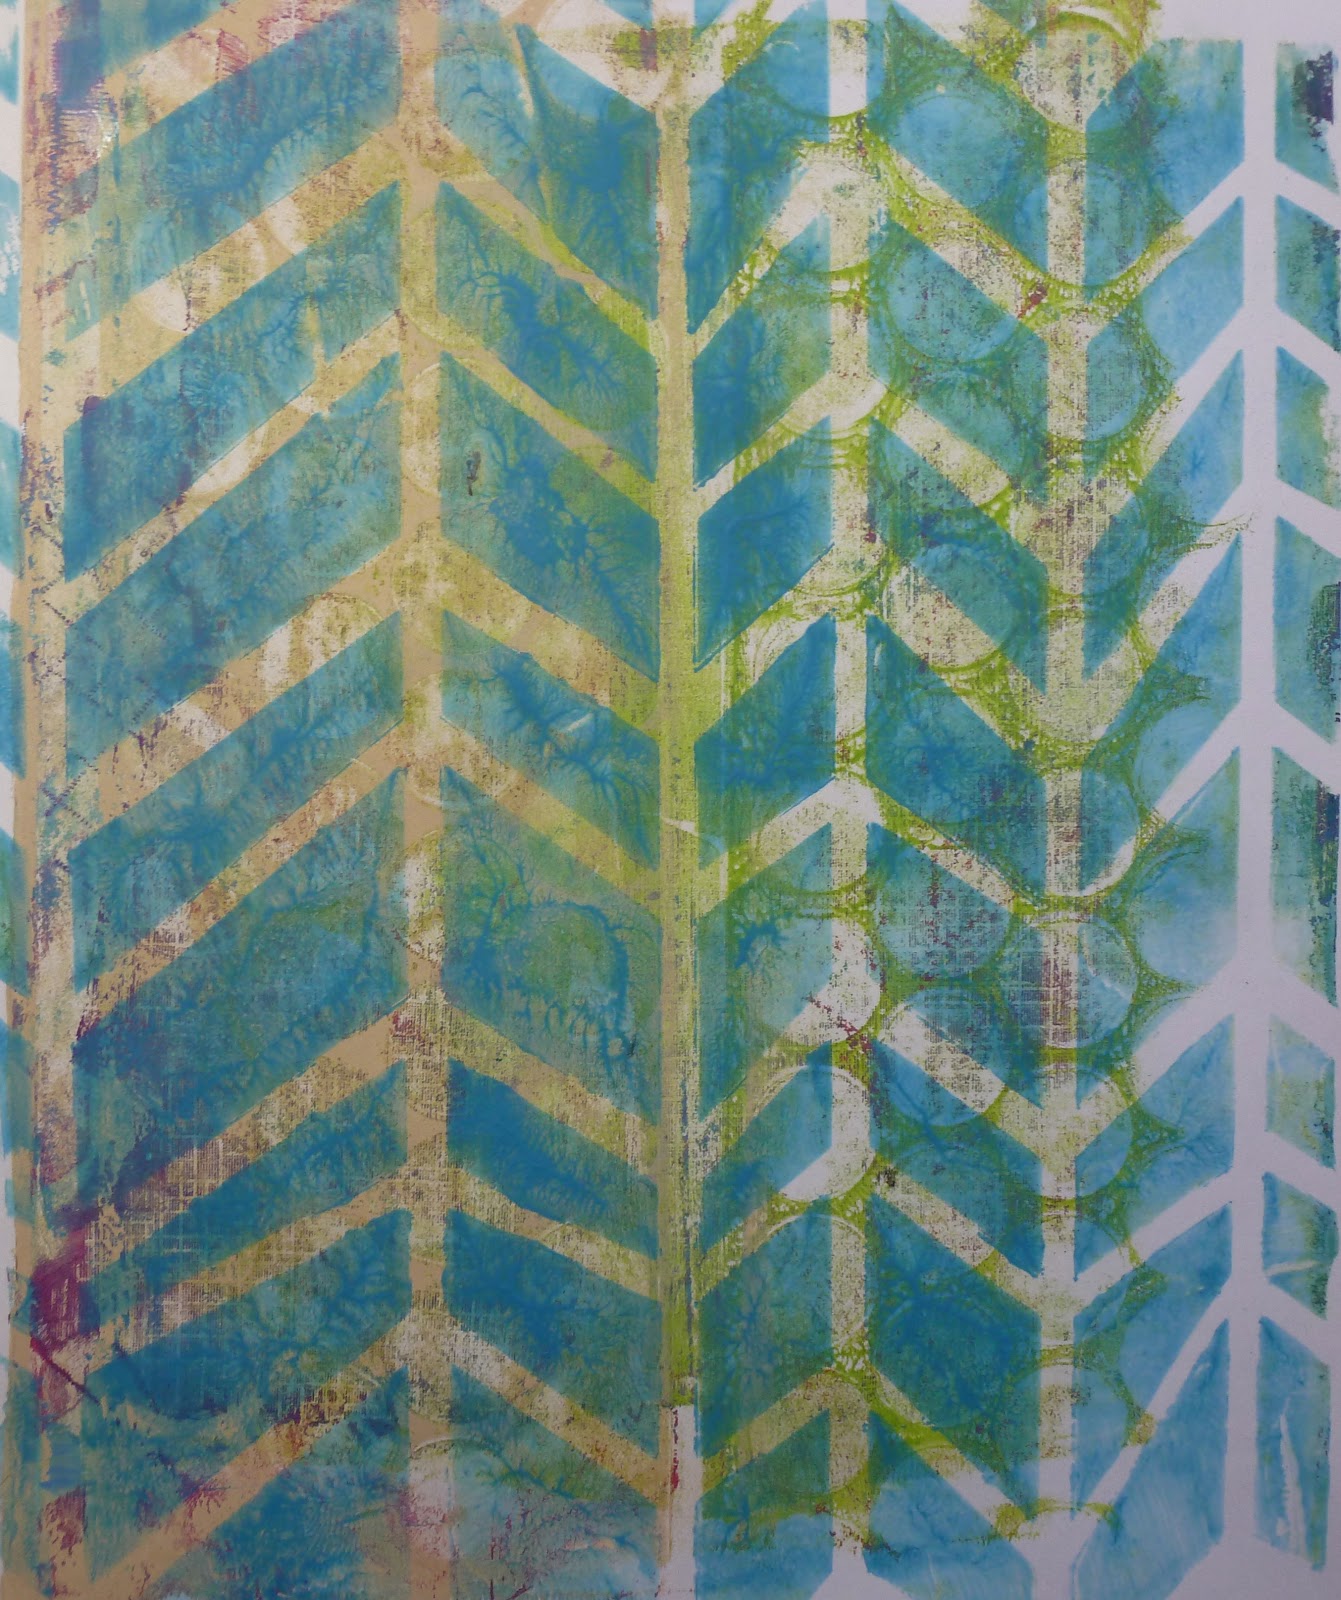
 Here is one closeup of the page. I used a Gelli Print as my base on watercolor paper.
The flowers were cut from a piece of Japanese Washi paper that I had been hoarding for a long time. They were highlighted with a white gel pen to pop more.
Black acrylic paint made the stems  with more white gel pen on top.
Another closeup:
Small letter stickers used for my quote, then outlined with a charcoal pencil & smudged so they weren't so white on the page. 

What do you love most about Spring? For me it means warmer temperatures are on the way. I intensely dislike winter, it tends to be cold, rainy and grey. When the first buds pop up and the trees begin to show color again. It makes my heart happy.

Where do you live? Waxhaw,NC
Literally spitting distance from Charlotte but enough out of the way that we are still a small community based town. Birthplace to both Andrew Jackson and James Polk it has a unique place in political history. Close to the Nascar Hall of Hame brings another bit of cultural history to us.


I genuinely appreciate you visiting my blog today and I'm offering a small prize to say Thank You. Just leave a comment for me on this post and I'll randomly choose a winner from all the comments left by Sunday, March 31st at 12:00am. 
The winner will be announced on Saturday, April 6th.

2 small sets of Prima clear stamps (Rondelle & love) as well as 2 packs of tiny alpha stickers by Kaisercraft and American crafts (each pack has 2 different alpha colors and over 1500 letters & numbers)
And don't forget that on the SEM Blog, we're going to choose a Grand Prize winner from a randomly chosen Design Team member's comments! Winner to be announced Saturday, April 6th.

If you've missed any stops along the way make sure you go back and comment for your chance to win...have fun hopping!

                                 Christy   you are here>>>>>now go 
here>>>  Elizabeth
Lisa


Thanks for stopping by and HAPPY HOPPING!

Wednesday, March 27, 2013

Shine


Been working on this canvas for a couple of days. 
Not because it was so labor intensive but rather right now I have so many projects going around my head I'm finding myself jumping from one to the next and back.
I used techniques learned from my weekend at Donna Downey's but then went and put my own spin on it, pulling in stamping and Pan Pastels.

This one is also a bit smaller than the one we did in class. For some reason I have a HUGE stash of 11x14 canvases. I really wanted it to be bigger but I probably need to use up a bit of what I have before I go buy more.

The base....using up a ton of Crafter's Workshop stencils and homemade spray paint (acrylic paint, water, misters).
Layering tons of color and patterns until the canvas is full.
I laugh, because my oldest keeps telling me to leave it as is. She loves the look of this; I might need to do one just for her.
She grumbles when I add over it. To each his own I say.


  Next I pulled out some Cobalt Blue, Prussian Blue Hue, Manganese Blue Hue, & Dioxazine Purple Golden Fluid Acrylics & mixed with Gesso to paint the background. I went light in areas so the pattern & color from the base still peeks through in spots.
  The stars are from another Crafter's Workshop stencil and painted with Gesso mixed with Gold acrylic paint.

More circles and paint through stencils once the background was dry.
I also added ink through the Art Is Stencil by CW in random spots.
The stars are outlined both inside and out with Pan Pastel in Neutral Gray Extra Dark. I love using the Pan Pastels like this, it's easy to blend and smudge the lines with either the sponge or, even better, your finger.

And here is the finished canvas.
I really need to get over the fear I have of using my own handwriting. I tried writing the word shine over and over and being so hypercritical wound up going with stencils and Black Gesso.
A white gel pen then outlined the letters and a dark shadow was added under the word using more Pan Pastel.

Below are several closeups. 
A few other special touches were paint through Punchinella and stamping with  Tsukineko ink & Prima stamps.


  Now that I've finished the canvas it's time for me to put the finishing touches on my project for the Scrapping Everyday Miracles Blog Hop happening this weekend.  So much to do so much to do.

  Thanks for stopping by and have a great day.

Tuesday, March 26, 2013

A few more layouts from Italy....

As I am sitting here desperately wishing for Spring to actually arrive I thought I would share some more layouts from our Italy trip this past summer.
It was hot hot hot while we were there and I am missing that.
I'd like to be able to not wear 12 layers just to leave the house (ok yes I know, I'm in NC which means really it's not that cold compared to some of you. But I'm a warm weather girl, I like it in the 80's at the very least)

All of these layouts appeared in past issues of Scrapbook News and Review.


The first is of the oldest (it was technically HER trip afterall) looking out over Rome our very first night in the city.
Standing still in the warm breeze you could just feel the history oozing around you.
The layout was created on a piece of HOTP craft card stock and embellished with mist, acrylic paint, some vintage lace and book text.


The next one is the 3 of them in Venice, Italy. Every corner you turned was a photo op waiting to happen. Here we stopped on one of the many bridges that cross the canals. Everyone had to stop and immediately get the picture.


The last layout has us back in Rome standing outside the Colosseum.
I created the layout using a single sheet of white card stock and a technique from my Resists class over at The Art Studio.

One of the best things about being a parent is the ability that we have to take them all over the world. Rejoicing in our differences and yet still how much alike we all really are.
There is nothing like exploring new places, whether it be in your backyard, or 10,000 miles away to get new perspectives on life.


And while I am at it I just want to let you know about an upcoming blog hop I will be part of.
I hope that you will take some time to stop by and visit for a few.


  Thanks for stopping by today and have a great day!

Saturday, March 23, 2013

Trust your heart


Time for another Gelli Plate project.
This is a new page in my art journal. I made the background up a few days ago using my Gelli Plate then had it sitting for a while letting me think on how I wanted to finish it up.
I did this huge green heart in the center of the page with a Crafter's Workshop stencil and the plate as well.
Soon as I was done I started kicking myself for using that color.
Instead of gessoing over the whole thing and starting over I decided to (in the immortal words of Tim Gunn) "make it work"

        First I continued on with Lake Mist paint dauber through punchinella randomly over the page. Starting to come together but still needed help. I have a combination of 50% water & 50% acrylic paint in a squeeze tip bottle so I pulled it out, and outlined the heart. Since the paint is already mixed with water it really dripped down. I wanted drips from the top and bottom so added extra paint where itwas needed.
  Ok I'm starting to like it, but not finished yet...

  I'm cleaning out stencils and found this old Club Scrap one that had the saying on it. I rubbed Prima ink through it and then highlighted the word heart with a white gel pen to make it pop off the page.
The little circles under are from a rub on.

  Finally as the end bit I sprayed heavy along the top with Dylusions Black Marble and lift it up to get lots more drips coming down my page.
NOW I like it!

  Lesson of the day, don't give up and immediately try to get rid of something you aren't happy with. Work with it. Who knows, in the end it may be worth it.

Thanks for stopping by and have a great day!

Thursday, March 21, 2013

Me....at 40


The Swirly Girls Challenge over at Swirlydoos this month is hosted by Manda called 
SCRAP YOUR AGE

Her challenge to us was to create a layout featuring just yourself, use monochromatic colors and show your age.
Oy, I tend to be the photographer in the family so finding a picture of just me proved to be the true challenge.
I used the March kit from Swirlydoos to create my layout.

  The base paper is from the Whitewash collection by Kaisercraft. I layered a bit of Prima over it then my photo.
 I used black gesso to go around most of the edges but then felt the black was too black and use Lake Mist paint dauber through some punchinella to break it up.

  For bonus points I dug into my stash of hoarded Dusty Attic chipboard and used the waddle blossoms (no idea what waddle blossoms are but love the pattern). I added some bits of Prima tape, flower & stickers for my title.

  40 is supposed to be middle aged right? I laugh at that, most days I feel like I'm still starting out with so much to learn.

  Thanks for stopping by and have a great day!

Tuesday, March 19, 2013

Gelli Printing the day away

I spent the morning filling out my March Madness brackets and eating to die for BBQ at
Saucemans with DH.
Came home stuffed to the gills (Coarse chopped pork, red slaw and sweet potato fries..I'm telling you...TO DIE FOR) and it was either lay down and take a nap or play for a while, I'm in a food induced coma right now so it couldn't be something I really had to think on.

I decided to pull out Gelli plate and play for a while, at the same time make up a few prints for the swap I am hosting over at PaperArtistsOnline.

I'm telling you this thing is addicting. I start with one piece of paper and in a matter of minutes I have them spread out all over the place drying.
Here are some of my favorites:

These 2 are on blotting paper. I bought a lot on Ebay super cheap, then tucked it away to be forgotten. This morning it fell out while I was looking for something else...fate, it needed to be used.
It's 25% rag, I wasn't sure how it would soak up the paint but OH MY GOODNESS!
I need bigger sheets of this, everything was super crystal clear. I prefer the one on the right, the one on the left I added black then cringed and added more. I may cut this down for ATC backgrounds, not quite sure yet, but like very piece of paper here it'll be used.


The next 2 were done with paint colors I had on my desk and the same stencils. The base of the top one was left over paint from my brayer and then I used my gelli plate to add pattern to it. The bottom one is straight on paint and stencils, nothing added. Which do you prefer?


This pattern brought in some metallic gold. If you haven't tried the Gelli Plate with metallics DO SO. It adds even another layer to the overall pattern and depending which way you move the paper will depend on how much or little of the shine you get.


Last but not least is this piece on an old dictionary page. The paper is so thin I had to be careful peeling it up from the plate as it stuck and started tearing in spots. Still I was quite pleased with how it turned out. It's basic printing with 2 stencils, I'll probably turn this into the background for an art journal page, If I don't put it in for swap ;).


So that's the play for today.

Thanks for stopping by and have a great day.

Saturday, March 16, 2013

More Gelli Prints sharing


Sharing a few Gelli Print projects today.

The first is a tag. I made the background last week while at Donna Downey's Studio during a class taught by Melissa.
Ever since I've been home I have been staring at it wanting to finish it off.
A little bit of stamping, outlined with a white Gel pen and the quote and it was done.


The next bit is just a print I made yesterday.
I love how easy it is to layer color and pattern using my Gel plate. I've been playing pretty much every day since I brought it home. This one started out as layers of leftover bits and pieces as I worked on an Art Journal page. The black diamonds tied it all together.
Even if you don't like the original print you can keep adding until you are happy.

  Making these prints has become my newest addiction.  I am hoping to get even more done today before the girls soccer games start. I'm pulling out all the old paints I have (fyi even though this works fantastic with all the old paints you've collected when you open up a jar and it falls out in chunks....it might be time to trash that bottle ) and rediscovering my stash.

  Thanks for stopping by and have a great day!

Thursday, March 14, 2013

Sisters


Someone asked me the other day if my girls ever fought. They said that in every picture I have of them they are grinning, posing and goofing off.

I laughed at that, I am blessed, my girls DO get along, them actually seem to enjoy spending time together despite their age differences, AND they are very accommodating when it comes to photos.

That being said they do have the occasional argument, usually over something ridiculous, which eventually leads to fits of giggles and causes them to forget what they were fighting over to begin with. According to my mom I'm lucky, I grew up with 2 sisters and we definitely did not get along as kids. It took us until our grown up years to begin to appreciate each other.

 I did this layout of the 3 of them posing last year when we were in Disney. It was freezing cold so they were huddled together for warmth while we waited in line for a ride. Perfect photo op (and the little one is in her favorite place, between the 2 older ones).

  I used the March kit from Flying Unicorn. The papers are all from Webster's, the die cuts are Kaisercraft and the little flowers are Prima. I used some new Pearl Pens from Viva as well. This was a case of what am I doing.Initially I stamped some flourishes and hated how they looked, so I used the Pearl Pen to trace over the stamped image, still not happy. Only after I added a bunch of the little flowers did I finally accept it.

  Thanks for stopping by and have a wonderful day!

Wednesday, March 13, 2013

Quick play day with Pan Pastels


 My oldest has been home from college for a few days so we have been spending some time together do Mom-Daughter things (ie shopping lol). 
Not so much crafting, I did however do up this quick piece last night using my Pan Pastels.
The base is an 8x10 canvas board covered with crumpled tissue paper.
  All the color is from Pan Pastels ( I think I used 8 or 9 colors on this piece) and they are SO easy  to blend. The stamped flourishes are from Tattered Angels and the word is a Unity stamp. I think start to finish this took a total of 20 minutes. I love how quick the Pan Pastels add color and a little goes a long way.

 Thanks for stopping by and have a great day.

Monday, March 11, 2013

Weekend at Donna Downey's

So as I had mentioned before I was getting to spend the weekend playing at Donna Downey's Studio up in Huntersville,NC with a bunch of my artsy friends.

The weekend was an absolute blast full of stencils, Pan Pastels and flying paint.
On Friday I worked on this canvas. Crumpled tissue paper on a canvas, color provided by Pan Pastels and StazOn.
It's not finished yet, I'm still thinking on what finishing touches I want to add.

Saturday was paint day.
We worked on 16x 20 canvases. Using homemade acrylic spray paint and a ton of stencils we all created some unique art. It was neat to see how everyone's painting progressed.
First we completely covered the canvas using stencils and paint.
Personally I liked how this looked but it's not done.
Then we began finger painting. My 2 large flowers are stencils with I painted in with a mixture of Gesso and gold acrylic paint. The other colors were a combination of Golden Fluid Acrylics.
I left spots of my background showing for some visual interest.


Finally it's done (I think).
Lots of dripping, stencils and stems I have a new piece of art for my walls.
This was such a fun piece to do.


Last but most definitely not least Melissa came into the studio Saturday night and taught a Gelli Plate class.

OH MY GOODNESS!!!!!

Now I have done mono printing before but this was to die for.
In 2 hours I knocked out over 30 prints. I love the fact that you can use up all that cheap acrylic paint collected over the years. With just a few supplies you can create tons of layered patterns.
I'm in love.


A few of my prints...


  I can't wait to make more at home. Course I probably also need to ACTUALLY use what I make but right now I am enjoying the creating time.
All in all it was a wonderful weekend. I got some much needed mojo energizing, wonderful time spent with friends, and some great techniques I'll be using again and again.

  If you ever get the chance to stop by the studio DO SO! the place is amazing and you can't help but walk out feeling so inspired.

Thanks for stopping by and have an awesome day!

Thursday, March 7, 2013

A few more layouts to share...

I've been busy packing for my crafty weekend getaway.
I get to go spend the next 3 days at Donna Downey's studio with 12 of my scrapping besties. We travel from all over the country for our bi annual get togethers and they are always a blast.
When we get to meet at Donna's Studio....even better.


So since a lot of my stuff is packed I haven't had a chance to do much creating the last few days.
I want to share a few layouts from resent issues of Scrapbook News and Review to share with you


The first is of my little one exploring a corn maze near us. The maze itself was super easy but still it took us FOREVER to get through it. 
We had to stop and look at everything along the way. I think she is definitely the one who makes me stop and look when we are out. She enjoys every minute of every day and wonders in it all.
It's hard to be jaded when she is around.

The patterned paper is from K&Co.
The flowers are from an Etsy shop called Funtoolas. The owner sells the most wonderful handmade flowers. Just a few pearl flourishes were all that was needed to finish it off.

This is me and Dh is Paris in April. He took me for my 40th birthday. Just me and him....no kids! Was I lucky or what?
I think this picture was taken during the only sunny moment there. Most of the time it was grey and rainy, but hey it's Paris. So I wasn't complaining.
The paper is from GCD Studios.
The circle stamp is actually supposed to be a coffee stan from Club Scrap, (next time you are in a rut try using a stamp in a different way) and the rub ons are from Daisy D.
A couple pieces of Washii tape finish it off after some distressing.


Here are big girl and little girl.
The two of them are best buds and if I can find one I can usually be sure the other is close by.
I splattered some Golden Fluid Acrylic paint in spots across the background. The patterned paper is all by BoBunny.
I also created a square around the center of my page and did my journaling that way. The journaling then becomes an integral part of my overall page design.
Framing the photo AND getting the story down.

And Finally...
My oldest graduated this past June from HS.
We were so busy running here and there, keeping track of everyone and trying not to melt (it was crazy hot), that it wasn't until that evening I realized I took 1 picture the entire time.
1---- CAN YOU BELIEVE IT???????
At least I got a good one lol. Oldest & middle posing on the grass after the ceremony.
I guarantee when the middle one graduates there will be far more photos taken. I'm preparing now (hey in 6 years I should be set)

The paper is from Kaisercraft and the flowers are from Petaloo
 So that's it. Just a few layouts from the magazine. I'll be back next week with lots to share from my weekend at Donna's.

 Thanks for stopping by and have a wonderful day!

Tuesday, March 5, 2013

Mary, Mary


Mary, Mary, quite contrary
How does your garden grow?

It was my turn to start off the Round Robin challenge for my team over at Swirlydoos. I love this challenge and try to participate every month, seeing how the layouts change as the weeks progress.

Spring is just around the corner (hopefully lol) and that was this month's theme. The twist was to include images of spring, ie flowers, seed packets, nature etc. The minute I saw the theme I knew exactly what pictures I wanted to use.

When we first moved to our house 8 years ago I planted tulips in the front circle. I had never done that before and I grumbled as I learned exactly what digging in the North Carolina clay soil entailed. It was say to say I didn't put forth my best effort.
Needless to say the next Spring I had these beautiful tulips popping up everywhere. They made me so happy. And as the years have passed more and more show up. For us it is truly the first signs of Spring. A riot of purples and greens for me to look out on every morning.


I used the January & February kits from Swirlydoos for my layout.

The base is Graphic 45. Once I had done all my layering and embellishing I still felt like my background was to plain. I took the "Art is" stencil from Crafter's Workshop and some Prima ink in Dry Sand. I rubbed the ink through the stencil in random spots. Not enough so you could read the quote, but enough to add some interest and depth to the page. It was the perfect finishing touch.

There are a few strips of burlap tucked in here and there just for some texture. The bird on the branch is a sticker from Webster's Pages that I have had forever. I love how it looks like he is sitting up and watching the little one.
  And for the title, she may be the cutest thing on the block but boy oh boy, as a third child she can be CONTRARY as the day is long. As I started scrapping and was thinking of a title for this page I couldn't get the nursery rhyme out of my head.

 In the end it worked perfectly. :)

Thanks for stopping by and have a great day!