Wednesday, October 31, 2012

Count Your Blessings

   A little over 2 years ago my Dad was diagnosed with Type 2 diabetes. In the following months he fought some major and life threatening infections. It eventually led to the lose of his lower leg. Through it all though he kept up beat about it. Always joking and laughing no matter how bleak it seemed.

  Now he is up and mobile even back at work. Determined that nothing is going to slow him down.
  My background paper is BoBunny. Gesso was dry brushed under the photo as a matte. The paper was also misted with Gingersnap Smooch Spritz. The numbers are created rubbing Branch Bark ink by Prima through a Crafter's Workshop stencil. Prima flowers and pearls finish it off, along with the reminder to Count Your Blessings.

  This layout was featured in Scrapbook News and Review.

Thanks for stopping by and have a great day.

Monday, October 29, 2012

Rock n Roll


It's week 4 over at Swirlydoos which means it was my turn to post for the October Sketch Round Robin.
The theme this month was Rock n Roll, and the twist was grunging it up.


I began by making my wings before anything else. LaQuette had created some on her layout and I immediately knew I wanted some too. I pulled out my bin of Grungeboard and found my wings and heart. The wings were first covered in Mica Gloss metallic effects ink by Judikins and once dry I stamped on them with black StazOn and a 7 Gypsies stamp.
The heart was covered with pieces of Washi tape before being adhered to the wings.


     For my background I took a piece of Kaisercraft sheet music and scraped Gesso over it with an old gift card. Once dry I heavily misted it with Buccaneer Bronze Moon Shadow mist by Lindy's Stamp Gang. I used a Club Scrap background stamp for another layer and finally rubbed ink, scratched at it and crumpled before stapling it to a piece of card stock.
    My lyrics come from the Queen song Crazy Little Thing Called Love. My girls are all huge Queen fans and it just seemed right to use lyrics from them.


  This is my final piece. I finished it over with some twine going across the page that I found on the floor (hey it worked) and a few more pieces of tape tucked under my background paper peeking out.

   Thanks for stopping by and have a great day!

Saturday, October 27, 2012

Laugh


     I love scrapping in a 12x12 format, yet every once in a while I like to shake things up. My next favorite size to use would be a 6x12. It still gives plenty of room to create yet it tends to be an unexpected size causing those looking to take a second.

This is a fun page I did for Scrapbook News and Review. My 2 older girls were just goofing around while we waited in line at Disney. They were cracking each other up and just having a good time


  It's fairly simple without a lot of extra. I really wanted to capture the looks on their faces as they goofed off.

  This page was featured in the June issue.


  Thanks for stopping by and have a great day.

Wednesday, October 24, 2012

Halloween is just around the corner....

     Halloween is just around the corner but there is still plenty of time to create some spookily fun art.


   Several of the instructors over at The Art Studio have some great classes lined up to help you get in the mood.


First up Shaylenne has 

Crafty & Yummy: Halloween Edition

  In Crafty & Yummy: Halloween Edition, I’ll show you how to use a variety of crafting supplies such as patterned paper, inks, punches, ribbon, stamps and more to create quick, easy and in-expensive Halloween projects such as cupcake banners, creative packaging for baked goods, candy presentation and drink decor.
  Click here to check it out. 


Andrea has this installment in her Handmade Flower Series
Bootiful Creations
 They’re creepy and they’re kooky, mysterious and spooky, they’re all together ooky...you know how the song goes. Just like the Addams family song, Bootiful Creations features different types of flowers from creepy to kooky. I’ve put together six chilling flowers that you can easily create and add to many different types of Halloween projects.

To create the Bootiful Creations you will need a spider web stamp, adhesive, hole punch, buttons, brads, ink, ink applicator and a few of your favorite flower die-cuts or punches.  I’ve also included a couple patterns just in case you’re short on a few supplies.

Don’t be a scaredy cat and miss out on the Halloween fun. Instead, grab some scissors, stamps, a hole punchy, glue and some gruesome Halloween paper and join me in class for a scary good time.
 Click here to check it out.

and last but most certainly not least Mo has this
Convertible Halloween Mini Album to Banner
Whether you deck your home out every season with the latest and greatest seasonal décor, or you’re lucky if you set out a Halloween candy bowl, you will take with you a plethora of ideas to construct a fabulous Halloween banner. Drape it on your mantle or simply hang it on your wall. When your banner is complete, the fun doesn’t stop there. I’ve developed many of the techniques and ideas in this class so that they are applicable to various themes, occasions and crafting projects. Use them over and over to your heart’s content!

You will learn how to create a Halloween banner using photographs of your choosing. If you’re not big on photos, I will show you how to use fun images from Halloween themed patterned paper to construct your homemade banner instead. Your banner can be any length and this design will allow you to add an additional page for a new year…and another…and another! And to keep with the spooky fun, watch as I show you how your creation can morph into hiding. This banner was designed to convert to a coffee table mini album…zany I KNOW! But zany is as zany does, take advantage of my mad-scientist crafty mind and get ready for an adventure. My fun-loving personality infuses this class with innovative and trendy ideas to keep you en vogue when it comes to paper crafting.

Treat your crafty hands to some cute flower making techniques, clothespin decorating, mummy doll-making, spooky fence-crafting, spider web-weaving, fun pocket-folding, tag constructing, and mini frame-embellishing all wrapped in one jam-packed Halloween themed class! You’ll also employ misting, glittering, and painting…and maybe even some dancing while creating your Halloween banner! I’ve also got a surprise or two hiding in the class for you. If you’ve got some fun photos or a stash of spooky Halloween-ey paper, there’s no need to wait for the holiday to arrive

Click here to check it out


Tuesday, October 23, 2012

Adventure

Sketch 154 has been revealed over at Let's Capture These Sketches


                     This was my take on it...
  The background paper is from The Scrap Cake. I added some Gesso and rubbed in a bit of Vintage Pink Glimmer Mist. Once dry I rubbed on Tin Can and Worn Jeans ink by Prima in spots and then stamped over with a script stamp by Kaisercraft.
 The sketch really lets you focus on the picture. I laid down strips of Washi tape and then just placed my matted photo over. The title pieces are from Pink Paislee, and were very appropriate. This photo was taken in Assisi, Italy overlooking the countryside. A most definite adventure.

Thanks for stopping by and have a great day!

Together

Yesterday was once again Mojo Monday over at the Flying Unicorn forum. A sketch is posted just to help your crafting mojo along (my mojo always needs a  boost on Mondays ).

This was the layout I created loosely following the sketch. My background paper is by Prima and I stenciled onto it using a stencil from Crafter's Workshop and Broken China Distress Ink.
I then dripped white liquid acrylic ink but when that barely showed up I splattered Gesso all over the paper using a wet brush.

Went over to my sewing machine and sticthed a circle several times (I love using my sewing machine on layouts, far easier than hand stitching ). The flowers are from the Laliberi line from EK Success.


This was the sketch offered up, the empty space on it was fun to work with.

 Thanks for stopping by and have a great day!

Monday, October 22, 2012

Today


The sketch challenge for the Belle Chanson kit is up at Swirlydoos.
I loved working with both the kit and the sketch. The colors this month are to die for.


  This is what I did with it. All supplies are from the October kit from Swirlydoos.
The background paper is from Heidi Swapp. I used an old credit card to spread some gesso then misted with Turquoise Blue & Sunkissed Peach Glimmermist.

 The title Today is a pice of chipboard from FabScraps that I colored with Black Coal ink from Prima. The flowers are all from Petaloo and the faux postage stamps are from Prima.

 The kit also has some resist canvas pieces from Prima. I sprayed one with Glimmer mist and used my sewing machine to attach it to my page.

  I love how easily the mist drips down when sprayed over gesso. I used my distressing tool to further distress my paper and inked with Black Coal ink.

 The photo is of the girls while we were on vacation in Italy. The history around us was almost overwhelming. Everything was so old, and it all seemed to have a story to tell. We were there for 10 days and barely brushed the surface of it.

 Thanks for stopping by and have a great day.

Saturday, October 20, 2012

Sometimes...

One of my other passions besides scrapbooking, mixed media and quilting is art journaling.I enjoy trying new techniques and products and using them in my art.  I have pages and pages that I have created over the years and always enjoy looking back through them and seeing how my art has evolved over time.

  I have a new art journaling series coming up at The Art Studio starting soon. Every 2 weeks or so a new class is released where I show you how to create your very own pages from start to finish. Each lesson is full of techniques and product play. There will be step by step downloadable instructions as well as full videos. I hope that you come check it out.

To give you a tease I'm going to share with you a short page tutorial that I did several months back for Scrapbook News and Review


 Supplies needed are a base (I use watercolor paper), stencils (Crafter's Workshop & Pink Paislee), 3 colors of acrylic paint (Liquitex), several background stamps (Kaisercraft)  and solvent ink (Tsukineko).

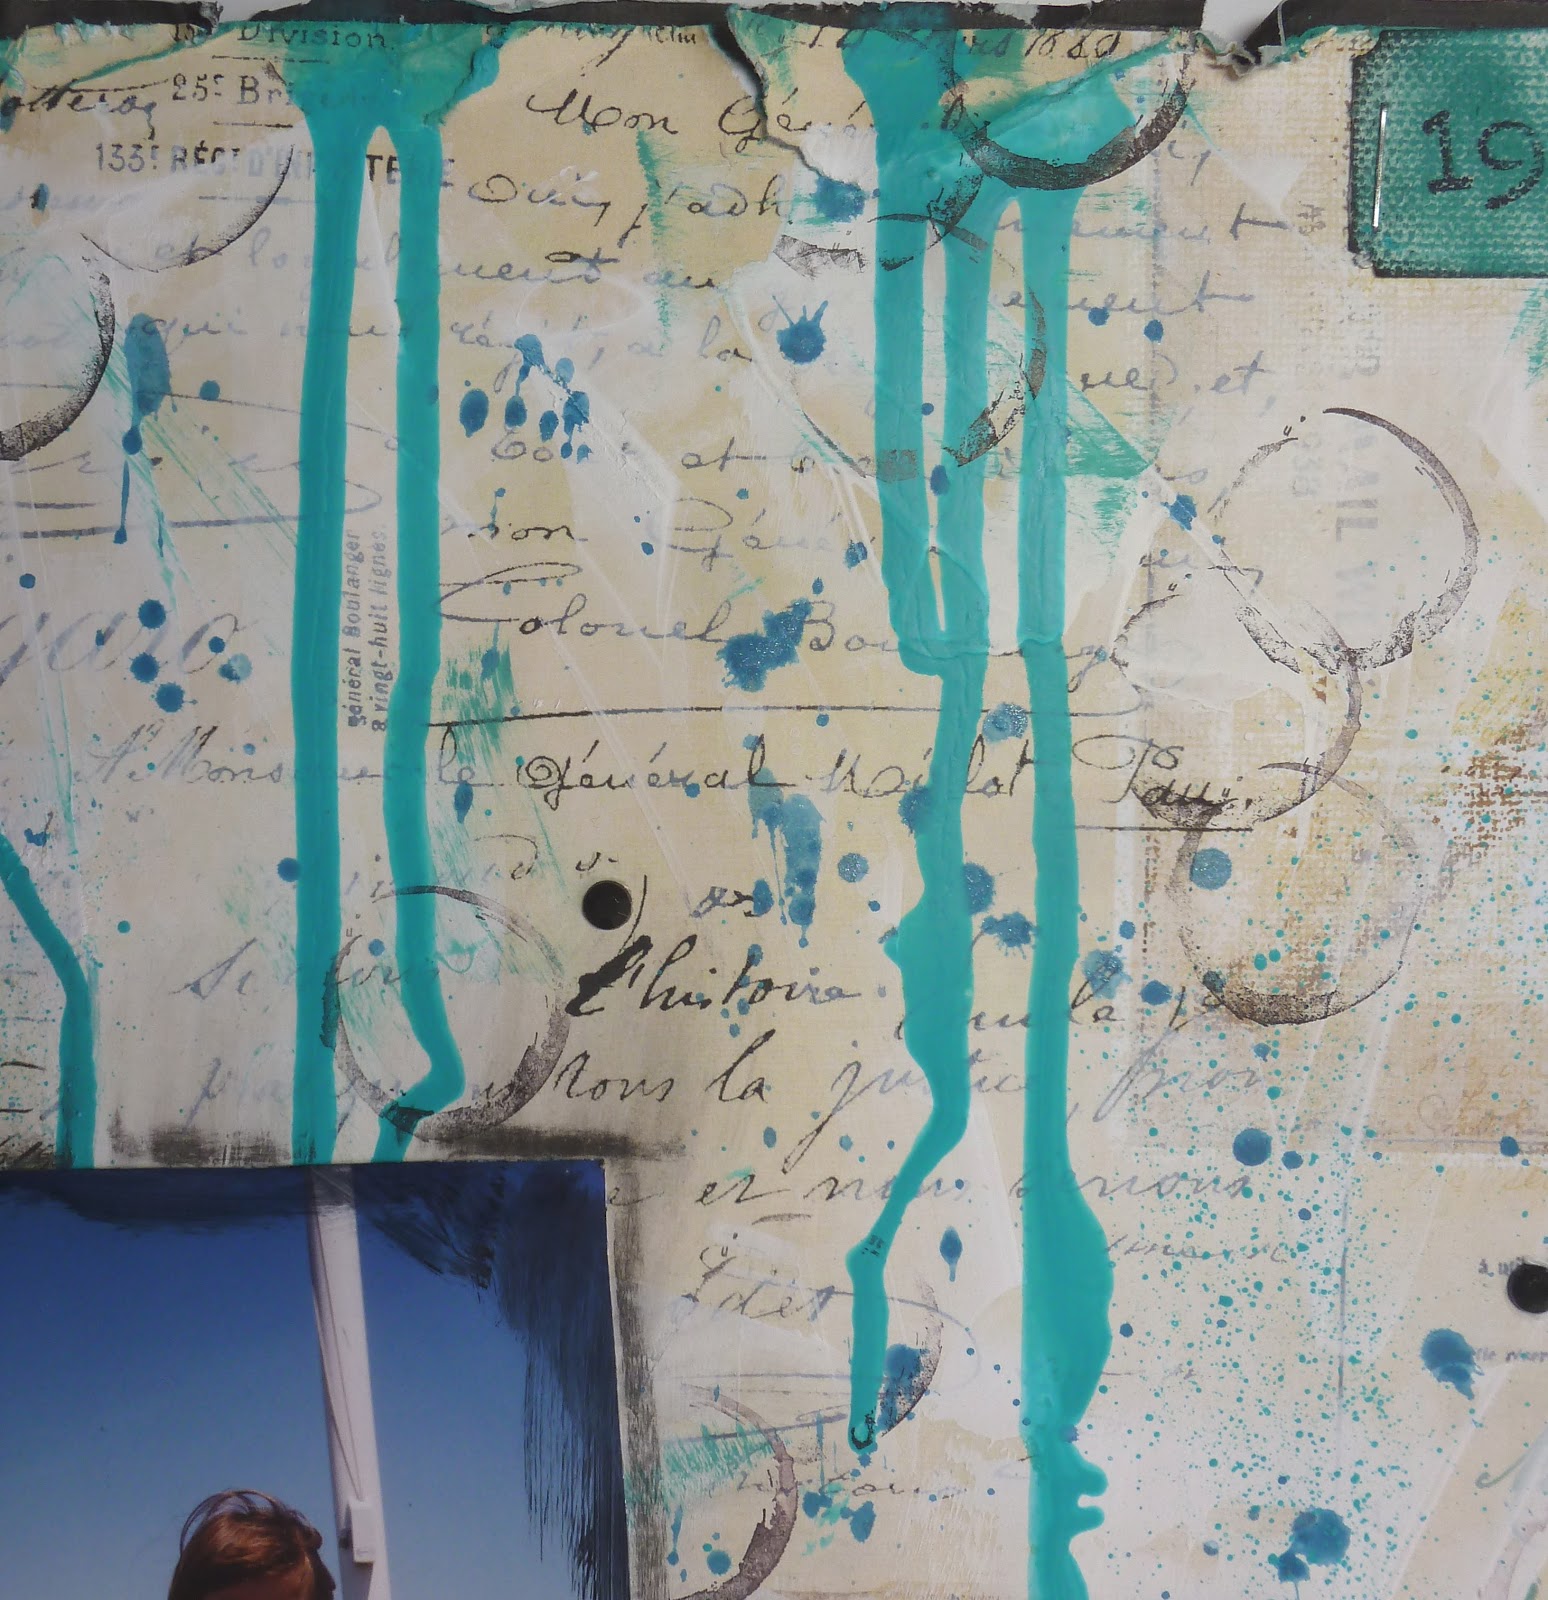
 Step One: Dry brush a loose layer of your first paint color. Don't cover the page; you want some of the white to show through. Dry completely.
 Step Two: Take your first background stamp and solvent ink and stamp randomly over the dry paint. You want to use solvent ink because it will dry almost instantly, won't smudge, and won't reactivate as you add more layers.
 Step Three: Lay the doily stencil in the lower right corner and add your second color of acrylic paint over it; I used a foam cosmetic sponge here to apply it. I also add a few spots of the same color in the upper left corner. Dry.
 Step Four: Take your second background stamp and ink it up with your solvent ink. Again stamp randomly over the page. The idea is just to get more and more layers down.
 Step Five: Take your diamond stencil and place it over the whole page. Using another foam sponge add the bright paint through it in spots. Dry.
 Add your journaling. Here I did it with stamped letters, stencils, chipboard stickers and my own handwriting. To add a final touch I took some Dylusions Black Marble mist and sprayed it heavily in one spot to get dripping as well as 2 other spots just for accents.

 I hope you have enjoyed this little tutorial and make sure to stop by The Art Studio to check out not only my art journaling series but all the other fantastic classes being offered by the talented instructors there.

 Thanks for stopping by and have a great day!

Friday, October 19, 2012

Mixing paper with fabric....


    I love fabric. My first love was quilting and when I discovered I could bring together fabric and paper together in my art I entered a very happy place.

  Over at PAO we are having a postcard swap. The only rule for this month was NO CARDSTOCK. I immediately knew that this meant my base was going to be fabric. I was lucky to get a good friend as my swap partner this time and I had no trouble coming up with my design.

  My base was a piece of muslin that I misted with Turquoise Blue & Sunkissed Peach glimmer mist by Tattered Angels. I layered on some book text inked with  Antique Linen Distress ink and lace. The fiber going across the bottom was cut off a doily window pull and I tacked it on in a few spots.
  
 The heart was cut out of sheet music, again inked with Antique Linen to distress it. The edges were further highlighted with Teal Damask ink by Prima. It was then zig zag stitched to my background.

 The flowers are by Prima and the leaves are from a Petaloo vine I had cut up for a previous project. The binding is a piece of batik fabric from my stash.

  I love all the textures I was able to create on this piece, the hard and soft as well as the colors. I'm really hoping the person who receives this loves it as much as I do.

 Thanks for stopping by and have a great day!

Thursday, October 18, 2012

Play Ball


The sketch challenge over at Scrapping Everyday Miracles features a sketch from Pagemaps this month. The challenge was to use shades of red or green on your layout. After thinking for a bit I finally settled on red mostly because I really wanted to showcase the pictures I have of my youngest playing soccer.

   I used an old kit from Birds of a Feather to create my layout. I like taking themed papers and embellishments (in this case Valentine's Day) and using them for something else. Girly and sporty all in one. The patterned paper is from Basic Grey the Kissing Booth line. I stamped on my background paper using stamps from Kaisercraft and Hampton Arts.


 This girl cracks me up when she is playing. She is so excited to be doing exactly what her big sister does and lacks no confidence as she plays. She runs out on the field with a grin and keeps it on her face until the very last. She wants to play with the like of Didier Drogba and Abby Waumbach and firmly believes nothing will stop her from being able to do it. I hope she never outgrows her self confidence.

 Thanks for stopping by and have a great day.

Wednesday, October 17, 2012

An Unhurried Sense of Time...

  The Kit of the Month challenge over at the Flying Unicorn was to use the October kit along with the theme of "Time". I wound up going fairly literally with my interpretation. The photo I chose to use is from inside the Musee D'Orsay looking out the clock face at Sacre Coeur. The quote fit what I was feeling. I've been in this museum several times but had never seen the view from here before. We were always rushing from painting to painting trying to keep up with the kids. This time however it was just me and my husband and we were able to meander along as slowly as we wished.


  The patterned papers are all from Kaisercraft and can be found in the October kit from Flying Unicorn. I took the chipboard gears from Basically Bare, covered them with a layer of Gesso, then a layer of Walnut Ink before sprinkling with a bit of gold embossing powder by Tsukineko.
   I stamped some more onto the papers using Frayed Burlap and Antique Linen distress inks from Ranger. The stamps are all from Stampin Up and Club Scrap. I also misted randomly in spots with Crushed Shells Glimmer Mist by Tattered Angels (It's one of my favorite mist colors, it's there but not there). There are also a few pieces of Washi tape around the picture and border of my paper.
   Finally just as an added bit of visual appeal I distressed these 2 tickets and stapled them to the paper. There are also some small gears colored with Prima ink sprinkled across the page.
 
  I'm trying to remind myself that I don't need to go go go all the time. It's okay to go unhurriedly through the day sometimes. It's the best way to really see what is going on around you.

  Thanks for stopping by and have a great day.

Tuesday, October 16, 2012

Sisters

  Over at Flying Unicorn they what they call "Mojo Monday" where every Monday a sketch is posted for inspiration.
 I really liked the sketch this week and had this candid shot of the girls goofing around that I wanted to use. The colors are way softer than what I use, I think I may have surprised myself when doing the page, I didn't even grimace when using the pink.

  The patterned papers are all from The Scrap Cake. The Yellow background paper already had a subtle triangle pattern on it. I enhanced it slightly by using the triangle mosaic stencil by Crafters Workshop and turquoise Pan Pastel. I love how the Pan Pastel sinks into the paper makeing it look like the color was already there.

  The flowers are 2 vines by Petaloo that I cut apart and added where desired. There are a few strips of paper that I distressed and layered underneath my photo.


  Thanks for stopping by and have a great day.

Monday, October 15, 2012

Watercoloring with Pigment Inks

    A little while ago I received several of the Pigment ink cubes from Tsukinenko and was given the task of creating several pieces of art with them for the magazine Scrapbook News and Review.
I wanted to go above and beyond just stamping with them and came up with this.
Using the inks as watercolor paints on a canvas sheet.

  First I cut a piece of canvas down to 12x12 inches and taking Solvent ink and my large stamp;
  I stamped three large flowers in the upper left corner and bottom right. I used the solvent ink because I would be adding water and needed a base that wasn't going to run.
  I began adding color using a Fantastix coloring tool. Dipping it into water and touching it to my ink pad. By regulating how much water I added I could vary the color and shade.
  Continuing on to color all my flowers...
  Then adding highlights with a brighter color, and filling in my center with yellow. All using the fantastix tool and water to turn my Pigment inks into a sort of faux watercolor. I dragged some color past the edges of my stamped image to create more of the painted look.
  The leaves were colored in the same way.
   I added some textured Goosebumps mist to my centers for some sparkle.
  This is the finished layout. I used more watered down ink to create a frame around my photo. The stencil is from Crafter's Workshop and I just used a Sharpie to trace it.
Machine stitching around the border to make sure my edges don't fray and to attach a touch of lace.
  I love how this came out. It looks like I spent hours painting when in fact it came together really quick. By adding just a touch of water to the inks you can create some really cool watercolored looks.

This layout and tutorial was featured in  Scrapbook News and Review.

Thanks for stopping by and have a great day.

Friday, October 12, 2012

Beautiful

Today I got to play with my paints and mists as I created this layout.
First I started with a piece from Heidi Swapp's new line. For a long time I really hadn't liked anything she was putting out but let me tell you, this new one is pick your chin up off the floor beautiful. I randomly spread gesso with an old credit card across the paper and once dry flicked some chalkboard mist across it (I had to flick because the nozzle broke into 3 pieces when I went to use it.
   I then dripped some Golden fluid acrylic paint in cobalt teal down from the top and made a fine spray mist with what was left on my paintbrush. I rubbed some Coal Black and Teal Damask ink from Prima into spots across the paper as well.
  I then pulled out my favorite little circle stamp from Club Scrap and stamped across my page. To finish it off I took a handful of black gems. Dropped them onto my paper and glued them where they fell.
  The canvas tickets are from Prima and I just colored them with the Teal Damask ink and edge with the Black Coal.

 This is my oldest daughter way back when she was 4. Hard to believe she is 18 now.

Thanks for stopping by and have a great day.

Thursday, October 11, 2012

Always

  Another of the monthly challenges over at The Flying Unicorn was to make a layout with NO (insert gasp) patterned paper and the colors red & black.
  For a bit I stared at my blank cardstock before finally coming up with an idea.

   First I took a piece of black card stock and put Modeling Paste through the brick stencil by Crafter's Workshop. Once it was dry I covered the whole page with chalkboard paint by DecoArt. I then took some chipboard flourishes by Kaisercraft, first sprayed them with Dylusions black marble mist and then  made a paint with pewter Perfect Pearls and painted over.

  I added my picture and in the corner went the painted / misted flourish. I created a flower cluster with flowers from Prima and Funtoolas (and Etsy store that sells amazing flowers). I squited some diamond Stickles onto my craft mat and added water to them. Using my paintbrush i painted them across my page. I'm not a huge fan of Stickles right out of the bottle but when I water them down and use them with my paintbrush I become much happier with them.
 There is a resin heart by Prima also tucked in among the flowers. She is after all my Valentine's Day baby.

  I can't believe how in much she has grown from this picture six years ago to now. She's not so little any more.

  Thanks for stopping by and have a great day.

Wednesday, October 10, 2012

Me, Right Now

 Over at Flying Unicorn one of this month's challenges is to create something with the title ME, Right Now.  Now scrapping about myself is not something I usually do but every once in a while I try to force myself to. I have books and books devoted to family members but as for me I'm sorely lacking. I use my scrapping to tell stories and keep memories, I have stories and memories to tell as well.

  Any way this was my layout
  I started with some The Scrap Cake patterned paper and added color with several stencils. I rubbed black ink through the little squares one and numbers.
 I added acrylic paint by Golden through the circles, and then outlined them with charcoal pencil smudging them all after. I then added more stamping using the gears stamp from Club Scrap and an Orange Pitt Pen by Faber Castell.
  More stamping using 7 Gypsies & Kaisercraft stamps with black ink.
  And as a finishing touch dripped the same acrylic paint I used in my circles down the paper.
 One of the requirements was you had to journal 5 things you were doing NOW. While I don't do many pages using my picture I journal even less about myself. I went with semi hidden journaling, cutting up squares of patterned paper, distressing them and tucking them partly behind my photo.

 While I do tend to shy away from scrapping myself I have to say I'm glad I jumped on this. It's a happy day.

Have a good one.